

Part IV: Action and decoration
- U-En Ng

- Feb 10, 2019
- 8 min read
If you've missed the earlier instalments of this blog, you can find them here.
By the end of the last post, we had put on all the strings on the instrument, setting the loops on the hitchpins and running the strings over the bridge where their positions were guided by pins, all the way to the front of the instrument over the nut (again with pins to guide them) and wound into tuning pins which are driven into the oak wrestplank. Here's the picture again of Andrew checking the bass pins after all we set up all the strings:

But what makes the strings sound? This is where the action comes into play and shows the harpsichord differs entirely from the piano, which is resembles on a superficial level. Whereas the action of the piano involves hammers striking the strings, harpsichord strings are plucked by little plectra (once made of quill but now plastic) inserted into thin but sturdy strips of wood called 'jacks' which are set in position slots in two 'registers' positioned in the gap between the wrestplank and the soundboard with the jacks all aligning with their corresponding keys. Each jack has a movable 'tongue' that snaps into place via a spring at the bottom (this is a thick plastic bristle). This allows the plectrum to pluck the string on the way up (when you press down the key), and bypass the string to reset when you release the key. You can see a side view of the action on Wikipedia, which describes the situation with our harpsichord pretty accurately.
As always, the principles might be straightforward enough but the execution is a little more complex, so we established a "production line" to make the most of our time. Each jack is sent longer than it needs to be so we can make final adjustments once all the other crucial steps in the construction (keyboard, stringing, etc) have been completed -- but this means that each jack must first be cut to the right height so the plectrum will just below the string it is to pluck -- so Lin did measurements, U-En did the cutting, and Andrew made sure that the hole in each jack was wide enough to take the plectrum, which he then carefully inserted with pliers. These would then go back to Lin for checking and marking.
In the photo below, you can see the business end of a jack (on the left) with some uncut plectra. Note the tongue on the left of the jack with the little horizontal slit for the plectrum. The vertical slit on the right is for the damper felt, which we'll insert later.

Once the jacks have been cut and fitted with plectra, the plectra themselves needed to be 'voiced', i.e. cut and whittled to the correct flexibility so as to pluck and return correctly -- and also pluck sweetly, with the correct tone and lightness of touch. There is a special way to do this too, with smooth and precise cuts with a very sharp knife on a little piece of wood called a 'voicing block'. (Here's a nicely detailed description of the process from our friend Carey Beebe.) Basically, each jack and plectrum must be treated this way, and there are 57 jacks to each choir of strings, with two choirs on our instrument... making a total of 114 of them.
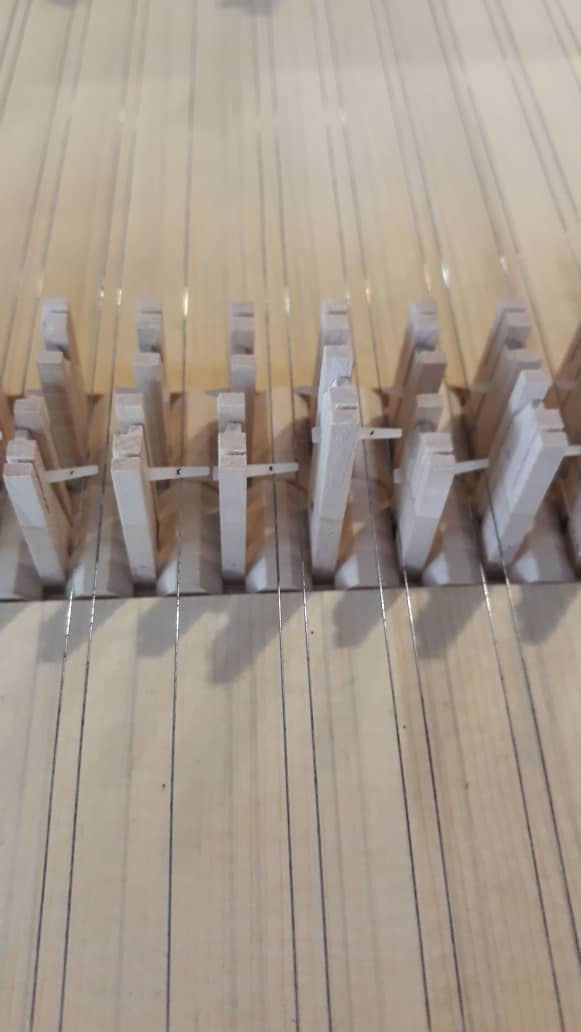
Here's a close-up of the jacks in their registers. You can see little black dots on the plectra, which we've marked in ink to show us precisely where must cut them so they pluck the strings correctly.
The registers themselves move left and right to engage and disengage the plectra from the strings, so we can choose to use the front or back register individually, or both at the same time, effectively doubling the volume produced. Even at this initial stage we found even a single register on our harpsichord to be nice and loud.
NB you might notice that there's a string missing on in the picture -- we lost quite a few strings in the course of stringing and voicing the harpsichord and haven't entirely determined why because there are a large number of factors involved, including methods of winding, angles, and even materials the strings are made of as well as how the strings are stored and handled -- but that's the beauty of this: we continue to learn something new at every step in the journey.
All this took quite some time -- we wanted to make sure that each key had the same 'touch', but each gauge of string plucks differently: bass strings are heavier than treble strings, for example, and the harpsichord was (and is) still acclimatising to our environment in Malaysia, which caused some unforeseen complications such as jacks getting stuck in registers, registers getting stuck in the gap because other bits (or the registers themselves) had swelled).
Once all this was done, it was time to put in the dampers into the pre-cut slots in each jack. The dampers are little pieces of felt cut from a single long strip. Without them, the strings would keep ringing every time they were plucked. It's a beautifully resonant sound to have them ringing all the time, but when it comes to playing we need sound to stop otherwise the notes will crash into each other. Thankfully, this was pretty straightforward process:
Once this was completed, we had basically finished the construction part of the project. There were still a few more finishing touches such as padding the jackrail (i.e. the wood cover over the jacks, which help prevent them popping out of the registers when we play them), sanding and glueing some decorative pieces such as the keyboard front moulding, and so forth, but for now all we needed to do was tune up the instrument in order to play it.
The joy of hearing it sing for the first time was of course immense. This was the culmination of months of work and, for amateur builders doing this for the first time, we had no way of knowing if our efforts would give us the results we were hoping for.
Decoration
The the building all done, final stage was the decoration, which we had been considering from Day One: what colour should the case be? Should we go the traditional way and use Flemish papers? What about the inside of the lid? Or should we take inspiration from the chinoiserie that later French builders used to decorate their cases?
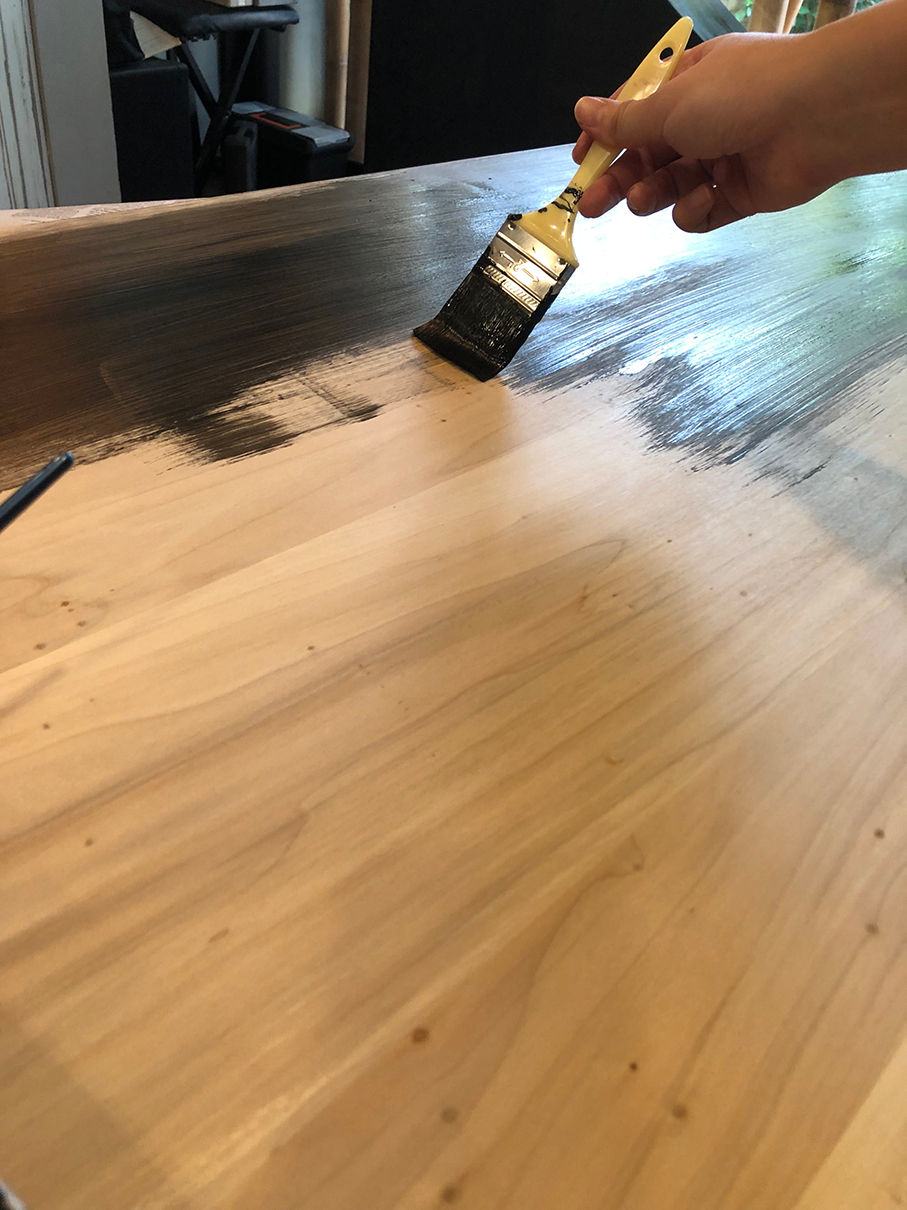
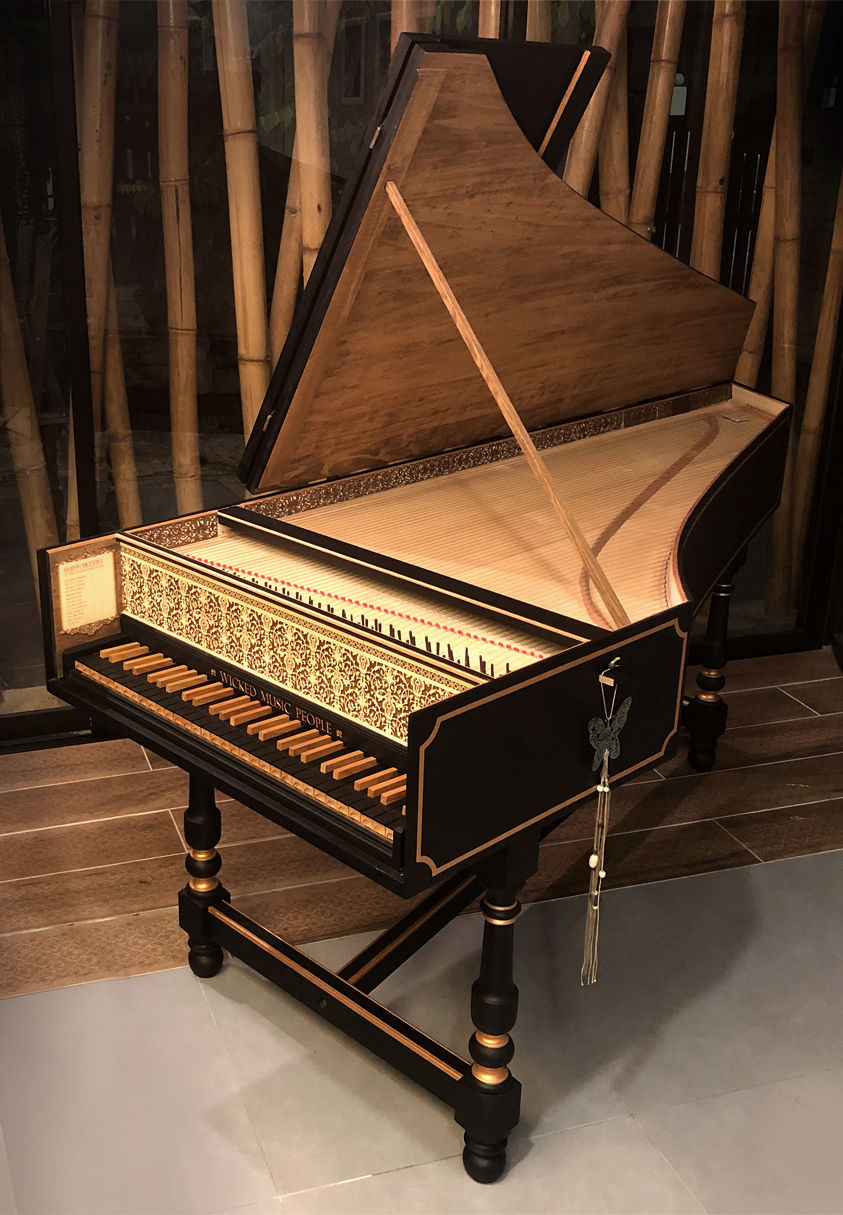
In the end we opted for a simple elegant black with gold trims in the French style. Here, however, is where we departed from the norm. After sanding all the wood to be painted, we sealed everything with shellac dissolved in alcohol (which we'd used to seal the soundboard). We opted not to prime the surface with gesso, allowing the grain to show through, and we decided to paint in acrylic rather than oil because it was a medium we were more comfortable working in and because the resulting finish was entirely matte, which was what we wanted to achieve.
We used Winsor and Newton Ivory Black for the body -- this was harder to work with because of its transparency, but we liked the particular pigment very much.

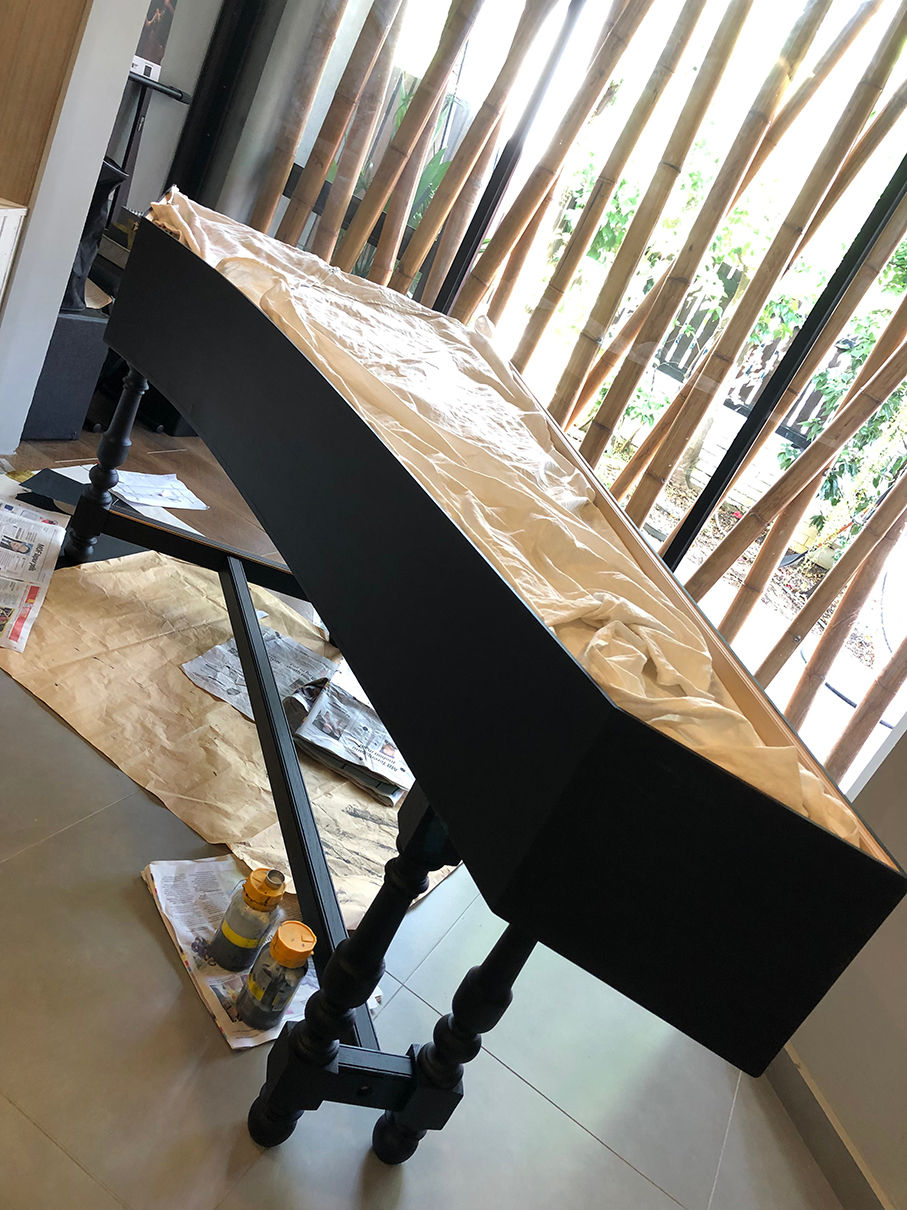
Here's what the painted case looked like once it dried:
For the trims, we used the same maker's Renaissance Gold, which is a red gold and looked very nice against Ivory Black. We applied this gold in place of the gold leaf that is traditionally used in the French scheme, but our method of application (very thick, almost straight from the tube) yielded some lovely results. Lin did the bulk of the fine gold paintwork, using painters' tape to mask out areas in order to get the beautiful straight lines.
For the interior of the lid and flap, we chose to use an oil-based stain instead of paint or paper. This was a little bit of a 'calculated risk' -- we had an idea of what the wood would look like under stain, but none of us was quite prepared for the lovely depth and character of the grain that popped out.
And here is the result of our paintwork (sans flap and with the stick still unstained)

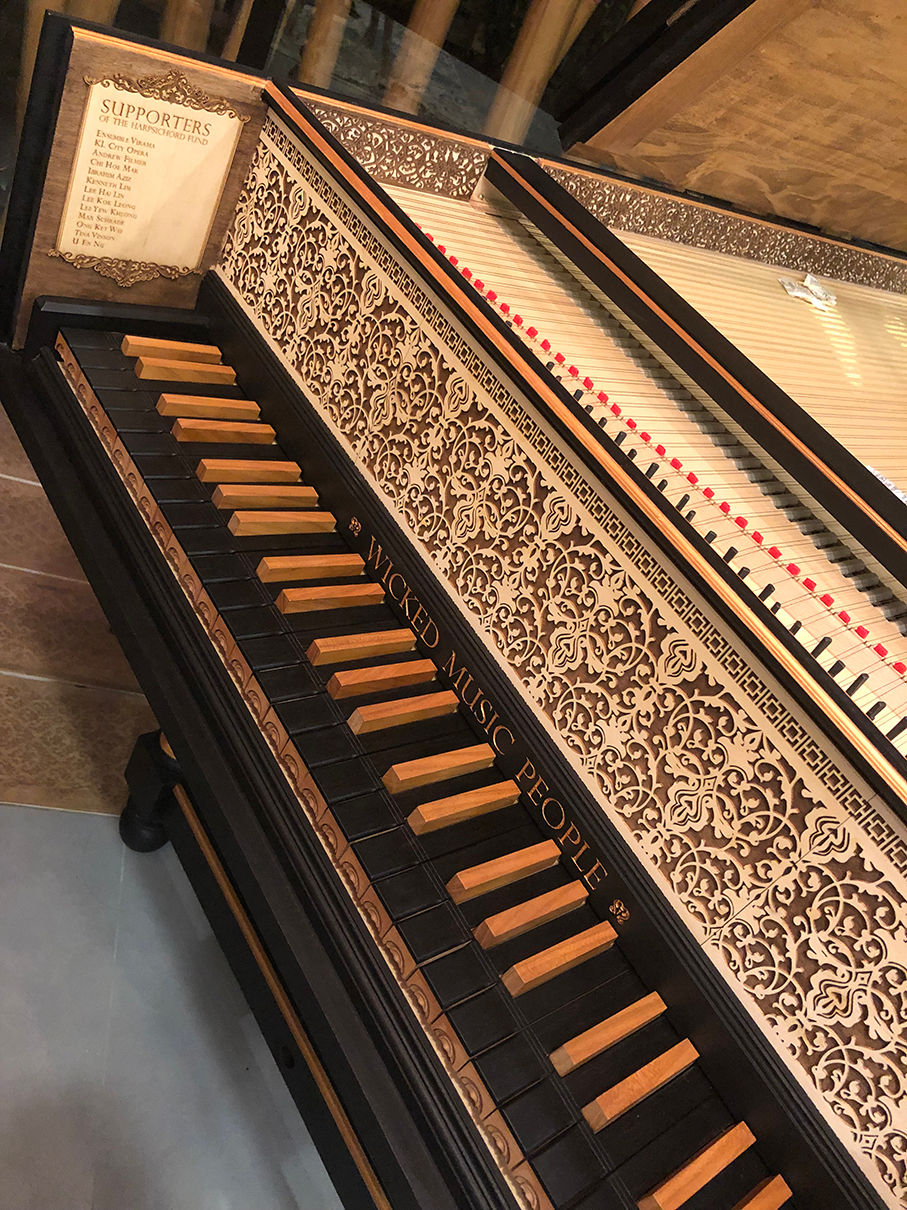
This, however, leaves one important matter still to do: the decorations along the rim of the soundboard and the keywell, which are traditionally done in paper. Through a suggestion from our friend Aik Shin in Paris, we decided to explore the possibility of localising this a little bit through the use of appropriate batik motifs -- many of which resemble the same arabesque designs of the original papers... but where can we get some workable samples?
Here, another friend, Yuqi, who is currently working at the Smithsonian, suggested that we visit her former employer: the Islamic Arts Museum, Malaysia, which generously allowed us access to their wonderful Scholars' Library and gave us every bit of help we needed to make reference copies of the designs we liked. (Our thanks to Librarian Fizah Bakeri and the management of the Museum for their kind assistance!)
After we had enough samples to give us inspiration to create our own patterns (which we initially decided to print on appropriate paper and then paste as per traditional practice), we stopped in the Museum Shop on the way out... here's where things changed and escalated rather quickly. The shop sold some of the same kinds of arabesque designs we'd been looking at -- but these were laser-cut onto veneer and turned into bookmarks. The veneer was thick enough to hold the fine details and the curves, but also thin and flexible enough to fit the bentside easily. Lin immediately set about designing our own set of 'prints' (after taking very precise measurements) and we contacted a specialist who did precisely this kind of job.
That specialist was Cuts Studio, and they took a lot of trouble to help us realise the designs we had in mind.
Again, the results were very nice indeed, and if you look closely you can see some of the characters in these blogposts making an appearance:


We had long strips (above) that would run the entire rim of the case surrounding the soundboard, with each segment (or group of segments) carefully measured to ensure the pieces would all fit together. We also had larger pieces (below) to go on the nameboard, together with some plates for the sides to commemorate those who contributed to the funding of the harpsichord:

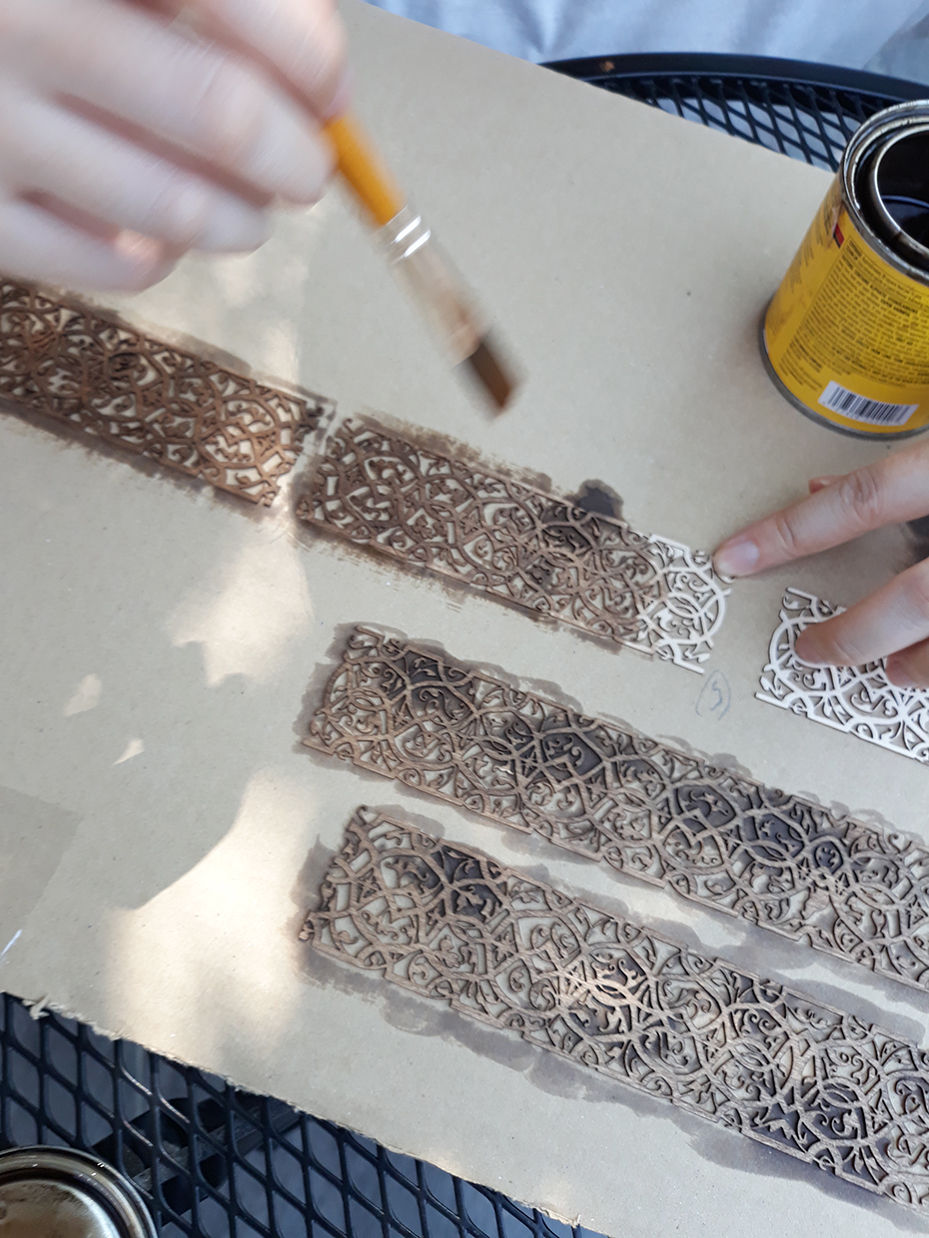
The larger pieces didn't need additional work: our scheme was to stain the nameboard and sides and keep the veneer natural there, but we would reverse this for the long narrow pieces that would surround the soundboard. We had to do this section of the staining very carefully because the 'vines' and 'leaves' of the arabesque pattern were very fragile and could break easily. Once they were glued in place, however, they would be quite stable.
Then we brushed on glue to the reverse and very carefully pressed the pieces into place, in the correct order as they all joined up to one another. This was tricky and brought back memories of our earlier construction work: we had to move quickly before the glue dried, and the water in the glue tended to warp the pieces, so we had to make sure that their positions and shapes were always correct.
But the final effect was lovely (even if we say so ourselves):
This brings us to the end of the Wicked Harpsichord construction blog... but the start of the harpsichord's journey. We'd like to thank everyone who helped make this instrument possible, helping raise funds for it, or helping us during various stages of the construction, as well as providing valuable moral support.
We hope you've enjoyed reading this blog and that you'll soon have a chance to hear and see the harpsichord in real life.


Comments